In this tutorial you’ll learn how to build a REST API using a Node.js server and MongoDB database. We’ll keep things simple and be building a “school” database that stores “student” records. Once you grasp the basic concepts used here you’ll be well on the way to creating more complex API based applications.
NOTE: You’ll need to install Node.js and MongoDB before proceeding.
Let’s start by creating a folder and initiating the project with the following commands:
mkdir school
cd school
npm init -y
We can now install the required dependencies using NPM:
npm install express mongoose body-parserexpress– Provides HTTP utility methods and routes to the different API endpoints.mongoose– Provides a straight-forward, schema-based solution to model application data.body-parser– Parse incoming request’s in a middleware before the handlers.
Next create an index.js file and include the dependences we just installed:
const express = require("express");
const mongoose = require("mongoose");
const bodyParser = require("body-parser");Code language: JavaScript (javascript)
Then initiate express() and set bodyParser to use JSON:
const app = express();
app.use(bodyParser.json());Code language: PHP (php)
We’ll be using mongoose to connect to the “school” database. This database doesn’t need to exist yet as it’ll be automatically created when the first student record is added:
const db = "mongodb://localhost/school";
mongoose
  .connect(db, { useNewUrlParser: true, useUnifiedTopology: true })
  .then(() => console.log("MongoDB Connected"))
  .catch((err) => console.log(err));Code language: JavaScript (javascript)
Finally tell the app to listen on port 5000 and log a message when the server is running:
app.listen(5000, () => console.log("Server Running"));Code language: JavaScript (javascript)You can now start the server by running the following command:
node index.jsCode language: Bash (bash)If successful you’ll see “MongoDB Connected” & “Server Running” logged in the terminal.
We’ll also install nodemon which monitors for file changes and automatically restarts the server so you don’t have to do it manually each time:
npm install nodemon --save-dev
nodemon index.jsCode language: Bash (bash)
Creating the model
Models are responsible for creating and reading documents from the MongoDB database.
Create a new folder called models and inside add a student.js file with the following:
const mongoose = require("mongoose");
const Schema = mongoose.Schema;

const StudentSchema = new Schema({
  name: { type: String, required: true },
  age: { type: Number, required: true },
  email: { type: String, required: true },
});

module.exports = mongoose.model("student", StudentSchema);Code language: JavaScript (javascript)
This defines our schema (name, age, and email) in a student collection.
Setting up the routes
Routes tell the application what code to execute when a specific URL (route) is requested.
Let’s start with the router that will add new student records to the database. Create a new folder called routes and inside add a student.js file with the following:
const express = require("express");
const router = express.Router();
const Student = require("../models/student");

router.post("/add", (req, res) => {
  const newStudent = new Student({
    name: req.body.name,
    age: req.body.age,
    email: req.body.email,
  });
  newStudent
    .save()
    .then(() => res.json("Student Added..."))
    .catch((err) => res.status(400).json("Error: " + err));
});

module.exports = router;Code language: JavaScript (javascript)
We then need to include the router the index.js file using the following:
const studentsRouter = require("./routes/student");
app.use("/students", studentsRouter);Code language: PHP (php)
Before creating the other endpoints let’s test that everything is working using Insomnia a free desktop API client (Windows & OSX). Once installed create a “New Request” with the following settings:

Send the request to http://localhost:5000/students/add with the following JSON data:

If successful you’ll see the “Student Added” message.
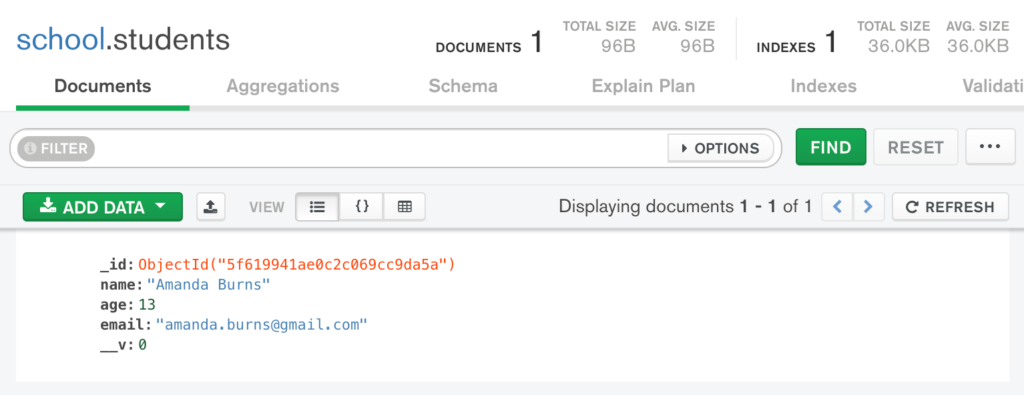
You can then use MongoDB Compass to visualise the database:

With the /add endpoint working lets proceed with creating the other routes.
All of the route’s should be added to the routes/student.js file.
First a GET request that returns all students in JSON format:
// http://localhost:5000/students/
router.get("/", (req, res) => {
  Student.find()
    .then((students) => res.json(students))
    .catch((err) => res.status(400).json("Error: " + err));
});Code language: JavaScript (javascript)
Next delete a student record that has the matching _id:
// http://localhost:5000/students/delete/STUDENT_ID
router.delete("/delete/:id", (req, res) => {
  Student.findByIdAndDelete(req.params.id)
    .then(() => res.json("Student Deleted..."))
    .catch((err) => res.status(400).json("Error: " + err));
});Code language: JavaScript (javascript)
Finally update a student record with the matching _id.
// http://localhost:5000/students/update/STUDENT_ID
router.post("/update/:id", (req, res) => {
  Student.findById(req.params.id)
    .then((student) => {
      student.name = req.body.name;
      student.age = req.body.age;
      student.email = req.body.email;
      student
        .save()
        .then(() => res.json("Student Updated..."))
        .catch((err) => res.status(400).json("Error: " + err));
    })
    .catch((err) => res.status(400).json("Error: " + err));
});Code language: JavaScript (javascript)
When updating a student you also need to pass the updated JSON data:
{
  "name" : "Amanda Jane Burns",
  "age" : "14",
  "email" : "amanda.burns@gmail.com"
}Code language: JSON / JSON with Comments (json)


