
How to make a custom Discord Bot with Node.js
Last modified March 3rd 2021 |
![]() Source Code [GitHub]
|
#node
Source Code [GitHub]
|
#node
Discord provides developers an excellent API for building Discord bots. Bots can programmed to perform a variety of tasks including posting automated messages, moderating servers, and much more. In this tutorial we’ll be building a simple custom Discord Bot using Node.js.
Create a Discord application
First thing we need to do is create an application in the Discord Developer Portal:
Click “New Application” and give your application a name. The application name is independent from the bot name so you can give the application any name you like as it isn’t public facing:
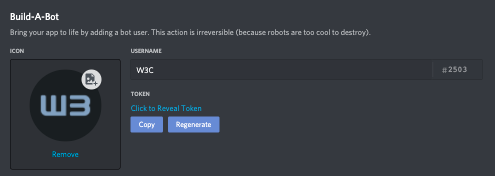
Add a Discord Bot to the application
With the application created we can now add the bot from the settings menu:
Add the Discord Bot to a server
The bot is now ready to be added to a server. Got to “OAuth2” section from the settings menu and select “bot” as the scope. We’ll also give the bot “Administrator” permissions so it can perform any task required:
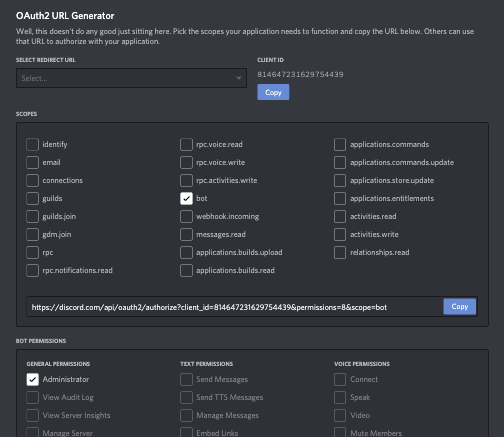
Next copy the URL into a browser and select the server to install the bot:
That’s all for the bot setup we can now start coding the functionality.
Setup the Node.js project
Run the following commands to setup the project:
mkdir discord-bot
cd discord-bot
npm init -y
discord.js is a Node.js module that allows you to easily interact with the Discord API so let’s install that with the following command:
npm install discord.jsCode language: plaintext (plaintext)Adding the bot functionality
Create a new index.js file in the project folder with the following:
const Discord = require("discord.js");
const client = new Discord.Client();
client.login("YOUR_TOKEN_HERE");Code language: JavaScript (javascript)
Get your token from the “Bot” section under the settings menu.
Before adding the bot functionality we need a ready event. Only after this will the bot start reacting to information it receives from Discord:
client.on("ready", () => {
  console.log("Bot ready!");
});Code language: JavaScript (javascript)
We can now test that the bot is setup correctly by running:
node index.jsCode language: plaintext (plaintext)You should see Bot Ready logged in the terminal if successful.
First thing we’ll have our bot do is provide an automated response to a command. For this we use an event listener that is triggered when a message content equals !ping:
client.on("message", (message) => {
  if (message.content === "!ping") {
    message.reply("Pong");
  }
});Code language: PHP (php)
Another common bot task is welcoming new users. We can do this by setting up an event listener that sends a message whenever a new user joins the guild:
client.on("guildMemberAdd", (member) => {
  const channel = member.guild.channels.cache.find(
    (ch) => ch.name === "general"
  );
  if (!channel) return;
  channel.send(
    "Welcome to the server, I'm the resident bot. You can find out how I was created here: https://w3collective.com/custom-discord-bot-node/"
  );
});Code language: JavaScript (javascript)
That’s all for this tutorial. Hopefully you were able to get your own bot up and running without any difficulties. If you’re looking to build more complex bots I’d suggest reading the discord.js developer documentation for more information.
Related Posts
#AD Shop Web Developer T-Shirts


