
Design & animate a pseudo 3D “Super Mario” with JavaScript (Zdog)
Last modified September 14th 2021 |
![]() Source Code [GitHub]
|
#zdog
Source Code [GitHub]
|
#zdog
I recently stumbled upon Zdog a 3D JavaScript engine for rendering simple 3D models on the Web. After playing around with the basic concepts I thought I’d attempt to design and animate an 8-bit style Super Mario.
To get started quickly I just installed Zdog via CDN but it’s also available via NPM.
<script src="https://unpkg.com/zdog@1/dist/zdog.dist.min.js"></script>Code language: HTML, XML (xml)Once Zdog was installed I created the required <canvas> HTML element:
<canvas class="zdog-canvas" width="300" height="300"></canvas>Code language: HTML, XML (xml)Next a new illustration was created that will render the final design to the zdog-canvas:
let illo = new Zdog.Illustration({
  element: ".zdog-canvas"
});
illo.updateRenderGraph();Code language: JavaScript (javascript)
Here’s how a single 3d box is created in Zdog:
new Zdog.Box({
  addTo: illo,
  width: 10,
  height: 10,
  depth: 10,
  stroke: false,
  color: "#000",
  translate: { x: 0, y: 0 },
});Code language: CSS (css)
To create Mario I’ll need to create a series of these boxes in a number of different colors and then position them by setting the x & y axis location. Here’s an image that shows each of the boxes (pixels) required to create Mario:
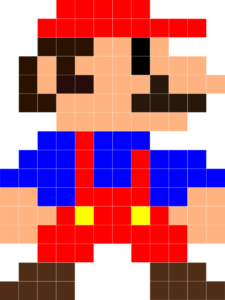
In total there are 144 boxes with 7 colors that will need to be rendered.
Next I defined variables for each of the colors:
const red = "#ff0000";
const blue = "#001cff";
const yellow = "#fffe00";
const black = "#000000";
const skin = "#ffaa7d";
const hair = "#340d00";
const shoe = "#5d2914";Code language: JavaScript (javascript)
Then created an array to store objects with the values for each box:
const mario = [
  // column 1
  { x: -60, y: 10, color: blue },
  { x: -60, y: 20, color: skin },
  { x: -60, y: 30, color: skin },
  { x: -60, y: 40, color: skin },
  { x: -60, y: 70, color: shoe },
];Code language: JavaScript (javascript)
This created the 5 boxes required for the first column, in total there are 12 columns (view full code here). I can now loop over each object adding a 10x10x10 box with the defined color and x/y position values to the illustration:
mario.forEach(function (block) {
new Zdog.Box({
addTo: illo,
width: 10,
height: 10,
depth: 10,
stroke: false,
color: block.color,
translate: { x: block.x, y: block.y },
});
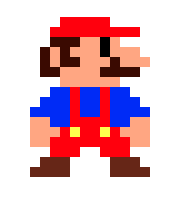
});Code language: PHP (php)Here’s what Mario looks like at this stage:
To complete the design I added some animation so Mario rotates in 3D:
function animate() {
  illo.rotate.y += isSpinning ? 0.05 : 0;
  illo.updateRenderGraph();
  requestAnimationFrame(animate);
}
animate();Code language: JavaScript (javascript)
Hopefully this tutorial has sparked your interest in Zdog and you start creating your own 3D models for the web. You can view a range of other examples and read the full Zdog documentation here.
#AD Shop Web Developer T-Shirts


