
Build a custom poll component with React & Node.js
Last modified January 24th 2023 |
![]() Source Code [GitHub]
|
#node #react
Source Code [GitHub]
|
#node #react
In this tutorial we’ll be building a React poll component that allows users to vote on a list of options and then display the results. Votes from the poll will be saved/retrieved from a JSON file using Node.js.
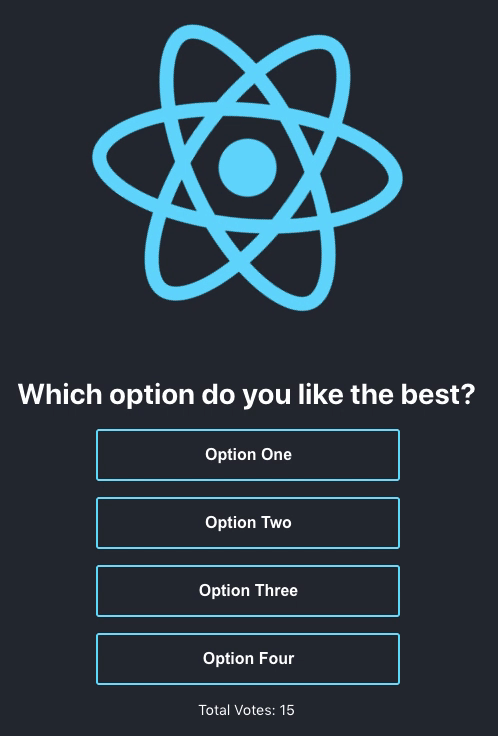
Here’s what the completed component will look like:
Let’s get started by setting a the project using Create React App:
npx create-react-app react-poll
cd react-poll
Setting up the Node.js backend
For the backend we’ll need to install the following modules:
npm install express cors body-parser
npm install nodemon --save-devexpress– used to create the endpoint for the GET & POST requestscors– allows the frontend and backend to share resources.body-parser– parse incoming requests so they’re available under thereq.bodyproperty.nodemon– restarts the server when a file is saved so we don’t have to do it manually.
Next inside the /src folder create the following files:
cd src
touch server.js data.jsonCode language: plaintext (plaintext)
Open the data.json file and add the following which will define the options for the poll:
[
   { "id": 0, "votes": 0, "option": "Option One" },
   { "id": 1, "votes": 0, "option": "Option Two" },
   { "id": 2, "votes": 0, "option": "Option Three" },
   { "id": 3, "votes": 0, "option": "Option Four" }
]Code language: JSON / JSON with Comments (json)
In the server.js file let’s start by loading the modules we previously installed. We’re also loading the built in Node.js file system module ("fs") which is used to update the JSON file when a vote is submitted:
const express = require("express");
const cors = require("cors");
const bodyParser = require("body-parser");
const fs = require("fs");Code language: JavaScript (javascript)
Define a new Express server using both cors & bodyParser:
const app = express();
app.use(cors());
app.use(bodyParser.json());Code language: PHP (php)
Complete the app setup with a app.listen() function that binds and listens for connections on port 5000:
app.listen(5000, () => console.log("Server Running..."));Code language: JavaScript (javascript)We can test the setup at this point by running the nodemon server.js command. If successful you’ll see the "Server Running..." message in the terminal. With the server running we now just need to implement the code for the GET (fetch data) and POST (submit data) requests.
We’ll start with the GET request which simply sends the data.json file:
const pollData = require("./data.json");
app.get("/poll", function (req, res) {
  res.send(pollData);
});Code language: JavaScript (javascript)
For the POST request we check that the body data (req.body) was sent, if so it gets saved to the data.json file otherwise an error message is returned:
app.post("/poll", function (req, res) {
  if (req.body) {
    fs.writeFileSync("data.json", JSON.stringify(req.body));
    res.send({
      message: "Data Saved",
    });
  } else {
    res.status(400).send({
      message: "Error No Data",
    });
  }
});Code language: JavaScript (javascript)
That completes the setup of the backend we can now move on to creating the React component.
Creating the React component
Let’s start by creating a component folder and creating the JavaScript and CSS files:
mkdir components
cd components
touch Poll.js Poll.cssCode language: plaintext (plaintext)
Start by adding the basic component structure in Poll.js. We’ll be creating a functional component that makes use of the useState & useEffect hooks:
import React, { useState, useEffect } from "react";
import "./Poll.css";

function Poll() {
}
export default Poll;Code language: JavaScript (javascript)
Inside the Poll() function we’ll first declare the variables for the State:
const [voteData, setVoteData] = useState();
const [totalVotes, setTotalVotes] = useState(0);
const [voted, setVoted] = useState(false);Code language: JavaScript (javascript)voteData– stores the data from the GET request.totalVotes– stores the calculated total of all votes submitted.voted– used to check if the user has already voted.
Using the Fetch API we make a GET request to the /poll endpoint and store the response in voteData. We also calculate the total number of votes and store them in totalVotes:
const url = "http://localhost:5000/poll";
useEffect(() => {
  fetch(url)
    .then((response) => response.json())
    .then((data) => {
      setVoteData(data);
      let sum = 0;
      data.forEach(function (obj) {
        sum += obj.votes;
      });
      setTotalVotes(sum);
    });
}, []);Code language: JavaScript (javascript)
Next comes the submitVote function that will be triggered by an onClick event. Here we’re incrementing the vote count for the selected option and then sending the updated data to the server:
const submitVote = (e) => {
    if(voted === false) {
      const voteSelected = e.target.dataset.id;
      const voteCurrent = voteData[voteSelected].votes;
      voteData[voteSelected].votes = voteCurrent + 1;
      setTotalVotes(totalVotes + 1);
      setVoted(!voted);
      const options = {
        method: "POST",
        body: JSON.stringify(voteData),
        headers: { "Content-Type": "application/json" },
      };
      fetch(url, options)
        .then((res) => res.json())
        .then((res) => console.log(res));
    }
  };Code language: JavaScript (javascript)
Once the voteData has been fetched we can map each of the options into <li> elements:
let pollOptions;
if (voteData) {
  pollOptions = voteData.map((item) => {
    return (
      <li key={item.id}>
        <button onClick={submitVote} data-id={item.id}>
          {item.option}
          <span>- {item.votes} Votes</span>
        </button>
      </li>
    );
  });
}Code language: JavaScript (javascript)
To complete the component we need to add the return statement which includes a heading, the poll options, and also displays the total vote count:
return (
  <div className="poll">
    <h1>Which option do you like the best?</h1>
    <ul className={voted ? "results" : "options"}>
      {pollOptions}
    </ul>
    <p>Total Votes: {totalVotes}</p>
  </div>
);Code language: JavaScript (javascript)
{voted ? "results" : "options"}– will change the class ifvotedistrue. This allows us to modify the styling of the component after a user has voted.
All that’s required now is to load the component into the App.js as follows:
import React from "react";
import logo from "./logo.svg";
import "./App.css";
import Poll from "./components/Poll";

function App() {
  return (
    <div className="App">
      <header className="App-header">
        <img src={logo} className="App-logo" alt="logo" />
        <Poll />
      </header>
    </div>
  );
}

export default App;Code language: JavaScript (javascript)
We’ll complete the tutorial by adding some CSS but at this point it’s a good idea to test that everything is working by running the following command:
npm run startWhen you submit a vote you should see the total votes increase, along with the vote count for the option you selected. You should also only be allowed to vote once (unless you refresh the browser).
Styling the component
We’ll give the poll a fixed width and center aligns all the options:
.poll {
  font-size: 0.9rem;
}
.poll ul {
  padding: 0;
  width: 300px;
  margin: auto;
}
.poll ul li {
  list-style: none;
  border: 2px solid #00ddf9;
  border-radius: 3px;
  line-height: 1rem;
  margin-bottom: 1rem;
  width: 100%;
}Code language: CSS (css)
Remove the default <button> styles and set its width/height to fill the <li> so the onClick is triggered no matter where the user clicks within the option:
.poll ul li button {
  border: none;
  background: transparent;
  outline: none;
  height: 100%;
  width: 100%;
  display: block;
  padding: 15px;
  color: #fff;
  font-size: 1rem;
  font-weight: bold;
}Code language: CSS (css)
We’ll hide the vote count for each option and only display it after they have voted to prevent any bias. To provide a visual indicator that the vote has been submitted the border color is also altered:
.poll ul li span {
  display: none;
}
.poll ul.results li button span {
  display: inline-block;
  margin-left: 8px;
}
.poll ul.results li {
  border-color: #999;
}Code language: CSS (css)
Related Posts
#AD Shop Web Developer T-Shirts


