
Code a double range price slider using HTML, CSS & JavaScript
Last modified June 28th 2024 |
![]() Source Code [GitHub]
|
#css #html #js
Source Code [GitHub]
|
#css #html #js
In this tutorial we’ll be coding a double range price slider. While HTML does have a native range slider input element this isn’t suitable for when a double range selection is required (min and max). So to achieve this functionality some creative CSS and JavaScript is required.
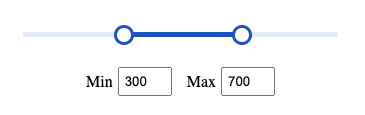
Before we begin here’s what the completed range slider will look like:
Let’s get started with the HTML markup required:
<div class="range">
   <div class="range-slider">
     <span class="range-selected"></span>
   </div>
   <div class="range-input">
     <input type="range" class="min" min="0" max="1000" value="300" step="10">
     <input type="range" class="max" min="0" max="1000" value="700" step="10">
   </div>
   <div class="range-price">
     <label for="min">Min</label>
     <input type="number" name="min" value="300">
     <label for="max">Max</label>
     <input type="number" name="max" value="700">
   </div>
 </div> Code language: HTML, XML (xml)
Here we have a 3 elements:
range-slider: used to style the background and selected range.range-input: range input elements for selecting the minimum and maximum value.range-price: number input fields for displaying and manually entering values.
When viewed in the browser the range slider will look something like this:

Now we can add some CSS starting with the slider background and selected range:
.range-slider {
  height: 5px;
  position: relative;
  background-color: #e1e9f6;
  border-radius: 2px;
}
.range-selected {
  height: 100%;
  left: 30%;
  right: 30%;
  position: absolute;
  border-radius: 5px;
  background-color: #1b53c0;
}Code language: CSS (css)
The key thing to take note of here is the left and right positioning which are both set at 30%. You’ll see that in the HTML the initial values on the range inputs are set to 300 & 700. This CSS ensures the selected range matches these default value on page load. Differing initial values would require the percentages to be adjusted accordingly.
Next we’ll add the styling for the range input elements:
.range-input {
  position: relative;
}
.range-input input {
  position: absolute;
  width: 100%;
  height: 5px;
  top: -7px;
  background: none;
  pointer-events: none;
  -webkit-appearance: none;
  -moz-appearance: none;
}
.range-input input::-webkit-slider-thumb {
  height: 20px;
  width: 20px;
  border-radius: 50%;
  border: 3px solid #1b53c0;
  background-color: #fff;
  pointer-events: auto;
  -webkit-appearance: none;
}
.range-input input::-moz-range-thumb {
  height: 15px;
  width: 15px;
  border-radius: 50%;
  border: 3px solid #1b53c0;
  background-color: #fff;
  pointer-events: auto;
  -moz-appearance: none;
}Code language: CSS (css)
Some browser specific styles are required to ensure consistent styling.
And to complete the CSS some basic styles for the min and max input fields:
.range-price {
  margin: 30px 0;
  width: 100%;
  display: flex;
  justify-content: center;
  align-items: center;
}
.range-price label {
  margin-right: 5px;
}
.range-price input {
  width: 40px;
  padding: 5px;
}
.range-price input:first-of-type {
  margin-right: 15px;
}Code language: CSS (css)
If you test this code in a browser it’ll initially appear to be working but you’ll soon discover that each toggle can slide the entire range and the selected range numbers don’t update. To resolve these issues we’ll need to use some JavaScript.
Up first in the JavaScript let’s declare the required variables:
let rangeMin = 100;
const range = document.querySelector(".range-selected");
const rangeInput = document.querySelectorAll(".range-input input");
const rangePrice = document.querySelectorAll(".range-price input");Code language: JavaScript (javascript)
rangeMin is the minimum range that can be selected and can be updated to suit your needs.
Next let’s add an eventListener for when the range inputs are toggled:
rangeInput.forEach((input) => {
  input.addEventListener("input", (e) => {
    let minRange = parseInt(rangeInput[0].value);
    let maxRange = parseInt(rangeInput[1].value);
    if (maxRange - minRange < rangeMin) {
      if (e.target.className === "min") {
        rangeInput[0].value = maxRange - rangeMin;
      } else {
        rangeInput[1].value = minRange + rangeMin;
      }
    } else {
      rangePrice[0].value = minRange;
      rangePrice[1].value = maxRange;
      range.style.left = (minRange / rangeInput[0].max) * 100 + "%";
      range.style.right = 100 - (maxRange / rangeInput[1].max) * 100 + "%";
    }
  });
});Code language: JavaScript (javascript)
Here we’re checking that the min and max range exceeds the minimum value we set as the rangeMin. If the min range is acceptable the value of the price input fields is updated along with some dynamic CSS that sets the left and right positioning of the selected range.
To complete the range slider we’ll add some functionality that will allow a user to manually enter a price into the number input fields and have the slider range update accordingly. Once again we’ll be using an addEventListener function to detect any updates:
rangePrice.forEach((input) => {
  input.addEventListener("input", (e) => {
    let minPrice = rangePrice[0].value;
    let maxPrice = rangePrice[1].value;
    if (maxPrice - minPrice >= rangeMin && maxPrice <= rangeInput[1].max) {
      if (e.target.className === "min") {
        rangeInput[0].value = minPrice;
        range.style.left = (minPrice / rangeInput[0].max) * 100 + "%";
      } else {
        rangeInput[1].value = maxPrice;
        range.style.right = 100 - (maxPrice / rangeInput[1].max) * 100 + "%";
      }
    }
  });
});Code language: JavaScript (javascript)
This function checks that the values entered fall within the minimum and maximum allowed values and that the range entered is greater than the rangeMin value. If both these tests pass the range input value and CSS is updated accordingly.
That concludes this tutorial. You should now have a working double range slider suitable for a variety of uses when a minimum and maximum range based selection is required. The full working source code for this tutorial can be found on GitHub.
Related Posts
#AD Shop Web Developer T-Shirts


