
Preview selected image (input type=”file”) using JavaScript
Last modified June 29th 2021 |
![]() Source Code [GitHub]
|
#css #html #js
Source Code [GitHub]
|
#css #html #js
By default only the file name is displayed when a user uploads an image using a file input field. Wouldn’t it be better if the user could preview the image before uploading? In this tutorial we’ll be doing just that by using JavaScript to display the selected image in the browser.
Let’s get started by setting up the HTML form with the file upload field:
<form>
  <div>
    <div id="img-preview"></div>
    <input type="file" accept="image/*" id="choose-file" name="choose-file" />
    <label for="choose-file">Choose File</label>
  </div>
</form>Code language: HTML, XML (xml)
It’s important to add "accept="image/*" so only image uploads are allowed.
Now we can write the JavaScript functionality to preview the image. First lets define the variables for the input field and the <div> that will display the image:
const chooseFile = document.getElementById("choose-file");
const imgPreview = document.getElementById("img-preview");Code language: JavaScript (javascript)
Next add an event listener that detects a value change on the input field. When this change is detected we’ll call a function to get the image data:
chooseFile.addEventListener("change", function () {
  getImgData();
});Code language: JavaScript (javascript)
The getImgSrc() function uses the FileReader API to insert the image into the page using it’s base64 encoded data:
function getImgData() {
  const files = chooseFile.files[0];
  if (files) {
    const fileReader = new FileReader();
    fileReader.readAsDataURL(files);
    fileReader.addEventListener("load", function () {
      imgPreview.style.display = "block";
      imgPreview.innerHTML = '<img src="' + this.result + '" />';
    });
  }
}Code language: JavaScript (javascript)
That’s it for the functionality, let’s add some CSS so it looks like the following:
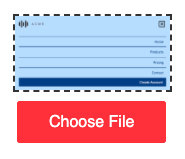
First we’ll to contain the size to prevent large images from breaking the layout:
#img-preview {
  display: none;
  width: 155px;
  border: 2px dashed #333;
  margin-bottom: 20px;
}
#img-preview img {
  width: 100%;
  height: auto;
  display: block;
}Code language: CSS (css)
Then the styling for the input field:
[type="file"] {
  height: 0;
  width: 0;
  overflow: hidden;
}
[type="file"] + label {
  font-family: sans-serif;
  background: #f44336;
  padding: 10px 30px;
  border: 2px solid #f44336;
  border-radius: 3px;
  color: #fff;
  cursor: pointer;
  transition: all 0.2s;
}
[type="file"] + label:hover {
  background-color: #fff;
  color: #f44336;
}Code language: CSS (css)
Styling <input type="file"> fields is limited so what we’re actually doing here is hiding the field and styling it’s label. This works because the file selector window is also triggered when the associated label is clicked.
That’s all for this tutorial, you know now how use the FileReader API to work with files in a web application. If you would like to learn more about this API the MDN web docs covers all the available methods and properties available.
Related Posts
#AD Shop Web Developer T-Shirts


