
Basic face detection with JavaScript (Tensorflow.js)
Last modified October 29th 2021 |
![]() Source Code [GitHub]
|
#js
Source Code [GitHub]
|
#js
Tensorflow is an open-source software library that’s used to develop and train machine learning models. It’s available in a number of different languages including JavaScript which we’ll be using in this tutorial to perform basic face detection from an image.
Note – You’ll need to run this on code on a server it wont work on the local filesystem.
Let’s get started by creating a HTML file and loading the required JavaScript libraries:
<!DOCTYPE html>
<html lang="en">
  <head>
    <meta charset="UTF-8" />
    <meta name="viewport" content="width=device-width, initial-scale=1" />
    <title>Tensorflow Face Detection</title>
    <link rel="stylesheet" href="style.css" />
  </head>
  <body>
    <script src="https://cdn.jsdelivr.net/npm/@tensorflow/tfjs"></script>
    <script src="https://cdn.jsdelivr.net/npm/@tensorflow-models/blazeface"></script>
    <script src="script.js"></script>
  </body>
</html>Code language: HTML, XML (xml)
Along with Tensorflow we are also loading Blazeface a lightweight pre-built model for detecting faces in images. Please note Blazeface was built for the purposes of detecting prominently displayed faces within images or videos it may struggle to find faces further away.
Next we’ll add the HTML markup:
<div id="face-finder">
  <canvas id="canvas"></canvas>
  <img src="image.jpg" />
  <p id="status">Searching, this shouldn't take long...</p>
</div>Code language: HTML, XML (xml)
The <canvas> element will be used to highlight the facial area if a face is found.
Now create a style.css file with the following CSS:
#face-finder {
max-width: 600px;
}
#canvas {
position: absolute;
top: 0;
left: 0;
z-index: 99;
}
img {
max-width: 100%;
height: auto;
display: block;
}
#status {
width: 100%;
background: black;
color: white;
text-align: center;
margin: 0;
padding: 1em 0;
font-family: sans-serif;
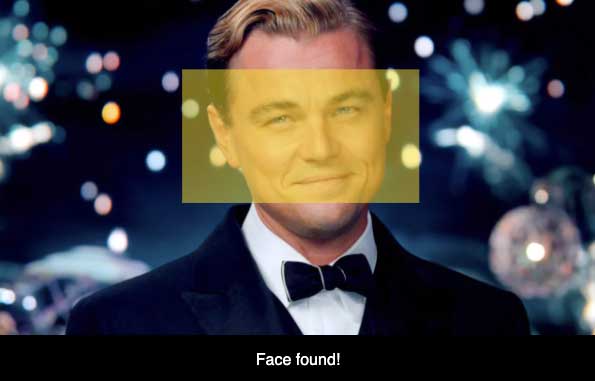
}Code language: CSS (css)This will position the canvas over the image. We’ll calculate the actual size required for the canvas using JavaScript later on so that it will adjust dynamically depending on the dimensions of image being used. I’ve used this photo of Leonardo DiCaprio with a clear facial area for detection.
Now for the JavaScript, create a new script.js file with the following function:
async function findFaces() {
  const model = await blazeface.load();
  const img = document.querySelector("img");
  const predictions = await model.estimateFaces(img, false);
  if (predictions.length > 0) {
    console.log(predictions);
  }
}. else {
  document.getElementById("status").innerText = "No Face(s) Found";
}
findFaces();Code language: JavaScript (javascript)
If you test what we’ve created so far in a browser you should see some parameters logged in the console if a face was found. This means it’s working as expected so we can now access these parameters and use them to draw a highlight each of the faces found by modifying the JavaScript as follows:
if (predictions.length > 0) {
  console.log(predictions);
  document.getElementById("status").innerText = "Face(s) found!";
  const canvas = document.getElementById("canvas");
  canvas.width = img.width;
  canvas.height = img.height;
  const ctx = canvas.getContext("2d");
  ctx.fillStyle = "rgba(250,225,6,0.5)";
  for (let i = 0; i < predictions.length; i++) {
    const start = predictions[i].topLeft;
    const end = predictions[i].bottomRight;
    const size = [end[0] - start[0], end[1] - start[1]];
    ctx.fillRect(start[0], start[1], size[0], size[1]);
  }
} else {
  document.getElementById("status").innerText = "No Face(s) Found";
}Code language: JavaScript (javascript)
Here we’ve calculated the canvas dimensions, we also need calculate how big the rectangle that covers the facial area needs to be as this isn’t returned in the predictions object. What is provided however is the x/y coordinates for the top left and bottom right corners which we can use to calculate the size.
That’s all for this tutorial. If you refresh the browser you should see a yellow shape overlaid on each face detected in the image. You can easily modify this script to detect faces from a webcam video, if you would like to see how this works checkout the Blazeface repository here.
Related Posts
#AD Shop Web Developer T-Shirts


