In this tutorial we’ll be using the HTML drag and drop API to create a re-orderable list in React. This type of functionality can be used for a number of things including todo lists, voting, or quizes.
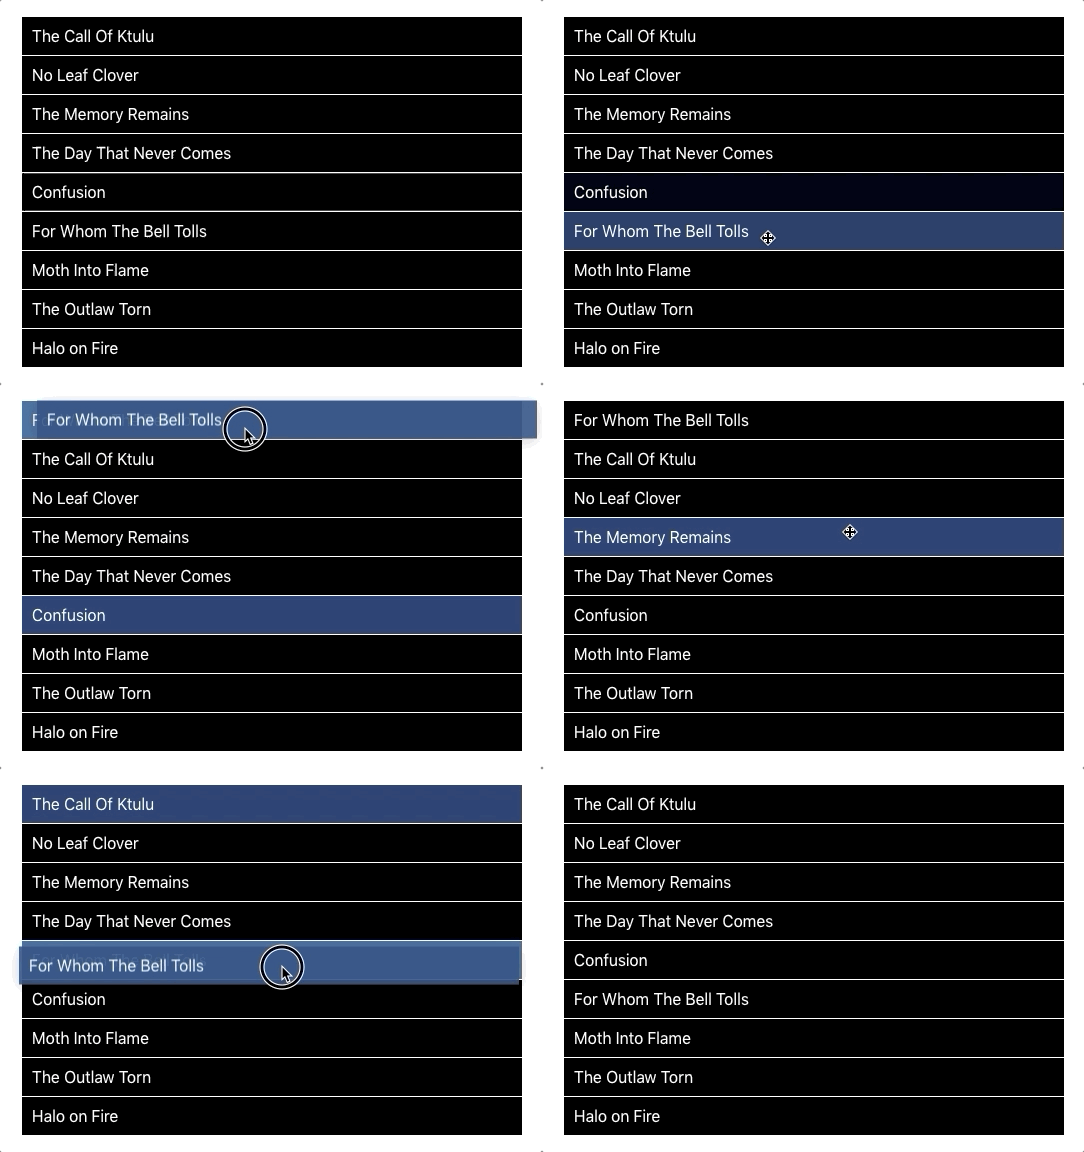
As the HTML drag and drop API is built into the browser no additional frameworks are required which keeps the code lightweight. Here’s a demo of what we’ll be building:
Let’s get started by setting up a new project using Create React App:
npx create-react-app drag-n-dropFor the purposes of this tutorial we’ll modify App.js rather than create a component. We’ll be using the useState Hook to save the order of the list items so we need to import that along with React itself and the CSS:
import React, { useState } from "react";
import "./App.css";

const App = () => {

};

export default App;Code language: JavaScript (javascript)
First up inside the App function we’ll declare the state variables:
const [dragItem, setDragItem] = useState();
const [list, setList] = useState([
  "The Call Of Ktulu",
  "For Whom The Bell Tolls",
  "The Day That Never Comes",
  "The Memory Remains",
  "Confusion",
  "Moth Into Flame",
  "The Outlaw Torn",
  "No Leaf Clover",
  "Halo on Fire",
]);Code language: PHP (php)
dragItem will be used store the item that is being dragged and the list contains an array that we’ll output into the application and is what we’ll be able to reorder using drag and drop.
Next we’ll add the functions for handling the events. These are all all triggered by drag events that are part of the HTML drag and drop API. I’ll go into each of these in more detail later in the tutorial when we setup the events in the HTML:
const handleDragStart = (index) => {
  setDragItem(index);
};

const handleDragEnter = (e, index) => {
  e.target.style.backgroundColor = "#336699";
  const newList = [...list];
  const item = newList[dragItem];
  newList.splice(dragItem, 1);
  newList.splice(index, 0, item);
  setDragItem(index);
  setList(newList);
};

const handleDragLeave = (e) => {
  e.target.style.backgroundColor = "black";
};

const handleDrop = (e) => {
  e.target.style.backgroundColor = "black";
};Code language: JavaScript (javascript)
The handleDragEnter function is doing the bulk of the work. It creates a copy of the list items in their original order before using the splice() method to insert the item into it’s new position and updating the list state.
Finally we return the list items into a <ul> using the map() function:
return (
  <ul className="dnd">
    {list &&
      list.map((item, index) => (
        <li
          draggable
          key={index}
          onDragStart={() => handleDragStart(index)}
          onDragEnter={(e) => handleDragEnter(e, index)}
          onDragLeave={(e) => handleDragLeave(e)}
          onDrop={(e) => handleDrop(e)}
          onDragOver={(e) => e.preventDefault()}
        >
          {item}
        </li>
      ))}
  </ul>
);Code language: PHP (php)draggable– sets the list item draggle property to true.key– helps React identify items that have changed.onDragStart– triggered when the user starts to drag a list item.onDragEnter– triggered when a draggable element enters a valid drop target.onDragLeave– triggered when a draggable element leaves a valid drop target.onDrop– triggered when a draggable element is dropped on a valid drop target.onDragOver– prevents ghosting when the list item is dropped.
To complete the project add the following to the App.css file:
body {
  display: flex;
  align-items: center;
  justify-content: center;
  height: 100vh;
}
.dnd {
  list-style: none;
  width: 500px;
  margin: auto;
}
.dnd li {
  cursor: move;
  background-color: black;
  color: #fff;
  padding: 10px;
  margin-bottom: 1px;
  transition: all 0.2s;
}
.dnd li:hover {
  background-color: #003366!important;
}Code language: CSS (css)
Excluding the background colors and cursor:move these styles are optional and can be modified to suit your individual needs. The background colors enhance the UI and changing the cursor provides a visual indication that the items are draggable.
That’s all for this tutorial. You should now have a good understanding of how the HTML drag and drop API can be incorporated into a React application.
